Reading books can open up a new universe. This is what happened after my son stumbled across the book Universe on our bookshelf. He began asking questions, his universe was expanding.
Teaching children about the universe can be exciting. There is so much to learn and the lessons can spiral into the future for mathematics, science and language. To keep the experience real we started the Solar System activity by singing the solar system song a thousand times 🙂 It’s a fun little video and catchy tune to learn about the solar system. This helped us get into the zone and we started thinking about the planets.
- Paint and brushes
- Different size styrofoam balls (we had some from old craft activities)
- Sticks (we used fruit skewers)
- Paper (we used recycled printed paper)
- White glue or paper mâché glue
- Bowl with a little bit of water
- Pin board (we found one for free at the tip shop)
- Hot glue gun
Method:
Part One
- Paint your pin board black and put it in the sun to dry.
- Mix a small amount of white glue and a touch of water in a bowl.
- Rip paper into small strips, dip these into the gluey water and then place on the styrofoam balls (similar to paper mâché). Make sure to cover all the surface. This step is important to make the painting process easier as paint doesn’t really stick to styrofoam.
- Place the balls in the sun to dry, have a quick snack while they dry.
 Part Two
- Carefully pierce the balls with the skewers. They may need a bit of pressure. Do this slowly so you don’t pierce them too far. Poke the ends into the grass. This helps the little ones to paint the balls without getting paint all over themselves.
- One by one paint the sun and planets. Ravi really enjoyed looking at the book and reading things about each planet while we painted them. He wanted to get the colours as close as possible to the version of the universe presented.
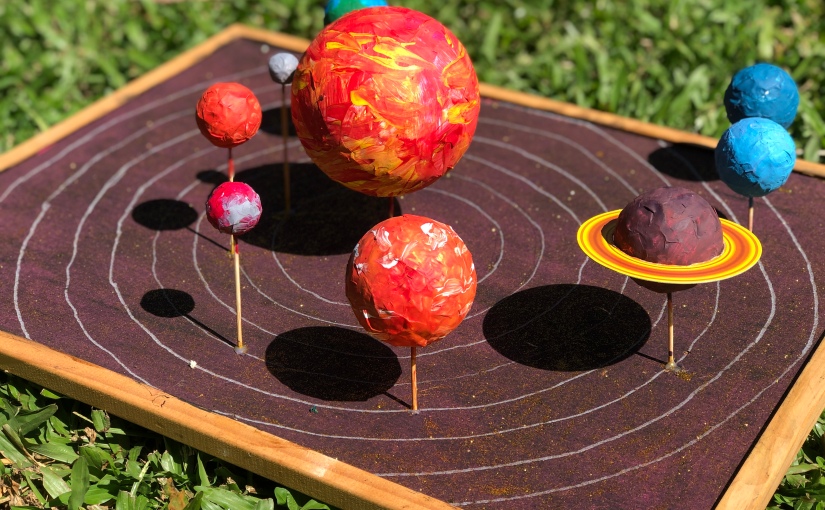
- While the sun and planets are drying. Measure your board and with a ruler draw the orbits for each planet, this will help you fit all the planets into whatever board you have found.
- Once the orbits have been drawn your child can then decide where in the orbit he/she wants to place the planets. Use a pen to mark the location of each planet. I had an interesting moment when we were doing this step. I wanted to place the planets in a certain location while Ravi wanted to put the planets in a spiral. So I had to step back and allow for him to create his own understanding of the universe. Being flexible and allowing for children to express their own creativity is key to homeschooling.
 5. With a spare skewer make the holes, where the planets are meant to go.
6. Squeeze a drop of hot glue in the hole (one hole at a time) and then allow for your child to put the planet in place. Move onto the next planet.
7. Allow the solar system to dry. In the meantime you can have another food and water break. Then move onto writing about each planet.
 Painting planet Earth is an opportunistic moment to talk about Mama Earth. We live on a beautiful blue planet that floats in the universe. We have only one home. How can we care for this home? What can we do to protect our home? You may be surprised with the answers that come from your child/ren.
 Once the solar system had dried Ravi decided he wanted to put millions of stars in his universe. We found some bio-glitter paint to represent the stars.
Tips for Homeschooling
- This project may take time to create. Don’t be in a rush to finish your project. If your child is in a rush or feels anxious, try reminding them that beautiful things take time to make, like growing seeds and waiting for flowers to turn into fruit.
- Stop for water and food breaks. My son enjoys his lunchbox break and his water bottle by his side.
- Play some music in the background to get into the zone.
- Have a time to start the project and a time to finish. This way you will slowly get into a routine.
- Allow room for your child to be creative and express their own understanding of things, avoid perfectionism and this impairs the creative flow.
- Ask open ended questions to stimulate discussion. Give them time to answer.
- Be patient and flexible, with your child and with yourself


Other Homeschooling Activities
If you are looking for more Homeschooling ideas check out the below links.
- Make a Worm Farm
- Make a Herb Spiral and Perfumed Night Garden
- Make Concrete Teddy Bears
- Create a Permaculture Design
- Make a Mandala Garden
- Learn About Vitamins with Children
- Make Beeswax Wraps
- Make Mosaic Stepping Stones
- Make a Keyhole Garden
- Make an Insect Hotel
- Make Upcycled Garden with Toys & Artcycling
- Upcycled Pallet Gardens
- Make a Butterfly Garden
We would love to hear about your homeschooling projects and experiences. Share your stories on either Instagram or Facebook and #planetschooling


This is amazing and innovative
LikeLike
Very neat ideas and good hands on work for children to help develop their brains and other skills.
LikeLike